
I always thought picoCTF was the simplest CTF, but it seems like “it depends” as usual. This problem was quite difficult, at least for me, but very interesting to solve!
Let’s start with the fact that the logic is quite clear: you need to enter something, and the crackme either ends with the message “You were eaten by a grue” or completes with the message “There is a flag!” and returns the flag. What’s interesting is that the first line is not visible in the binary:
1 2 3 4 | $ strings -a ./matrix | grep grue $ strings -a ./matrix | grep flag Have a flag! flag.txt |
Digging into the binary, it turns out that it only has one function, which takes some parameters as input, including pointers to function wrappers getc and putc, which do the I/O. After some time, I was surprised to discover that this function is a virtual machine that executes the “code” passed as one of the fields of the structure that is passed in as a parameter! The easiest CTF, huh? The structure itself represents the state of the virtual machine, which looks like this:
1 2 3 4 5 6 7 8 | struct VM { void* machine_code; short instruction_ptr; void* stack; void* extra_stack; char (*getc)(); void (*putc)(char); }; |
The virtual machine has only 15 instructions, one of which is nop, and they are all stack-based. Or, in other words, it is a virtual machine that implements some stack-oriented programming language. The only thing is that there are two stacks inside: the main one, which is used by almost any instruction, and the second, which I call the “extra” stack. This is a temporary location, used mainly to save variables for future use, swap values, etc. VM operates only on words, i.e. any stack value is 2 bytes long.
Here is a list of opcodes and the corresponding instructions that I have chosen for them. It’s a little difficult to map one VM opcode to one x86 assembly instruction, so I decided not to come up with a new assembler (mostly) and decode them as a sequence of instructions. There are no registers in the VM structure, but I decided to use r1 and r2 as temporary storage for the data used in these instructions, and sp as the current stack pointer. Keep in mind that in my case the stack grows forward and sp always points to the current empty slot, so [sp-2] is the last element pushed.
To access the “extra” stack I use two custom instructions push_e and pop_e. Additionally, the called function will return the result in the register r1, just as if it needed a parameter, it will either be on the stack or in the register r1.
| Opcode | Length | Disasm |
| 0x00 | 1 | nop |
| 0x01 | 1 | pop r1 ret |
| 0x10 | 1 | push [sp-2] |
| 0x11 | 1 | pop r1 |
| 0x12 | 1 | pop r1 add [sp-2], r1 |
| 0x13 | 1 | pop r1 sub [sp-2], r1 |
| 0x14 | 1 | xchg [sp-4], [sp-2] |
| 0x20 | 1 | pop r1 push_e r1 |
| 0x21 | 1 | pop_e r1 push r1 |
| 0x30 | 1 | pop r1 jmp r1 |
| 0x31 | 1 | pop r1 pop r2 test r2, r2 jnz NEXT_INSTUCTION jmp r2 |
| 0x80 | 2 | push NUMBER NUMBER is 1 byte long, sign extended to word |
| 0x81 | 3 | push NUMBER NUMBER is 2 bytes long |
| 0xC0 | 1 | call getc push r1 |
| 0xC1 | 1 | pop r1 call putc |
To make life a little easier, I wrote a small disassembler that converts the bytecode into the described instructions so that I can read it and annotate it if necessary. I ran it, opened the listing, and tried to read all 1362 lines it generated. Honestly, this is a tough read because of these pop/push/push/pop/push calls that you need to keep track of. My idea was that if a virtual machine is so simple, it should implement common logic like loops using some templates. Also, it looks like the compiler was very simple since it generates a lot of unnecessary instructions in a block that could be greatly simplified. Or is this some kind of obfuscation?
Anyway, I spent some time cleaning up and commenting out the listing, and the main file ended up being just 307 lines long, including comments and print lines that are also pushed onto the stack character by character. My cleaned-up version doesn’t follow the original assembler (I’ve expanded it a bit), but in return, it gives more clarity. The next surprise was that this was actually a maze game. A MAZE GAME, omg! Using a custom assembler on a custom virtual machine! With traps and character health! Not bad at all.
Most of all code in the generated listing is the map: it’s a 16×16 array where each cell contains code that either allows you to enter that cell or implements other things like walls and traps. The size of the code in a cell is 4 bytes. There are five types of cells:
| Opcode | Symbol | What |
| 30000000 | space | Place where you can walk |
| 81FB0030 | X | Wall |
| 817F0530 | + | Get health |
| 81740530 | – | Trap |
| 81850530 | ! | Exit |
Finding your way on a 16×16 map is easy when you can see it, so I wrote a little utility that draws one. It turned out that it looks like this:
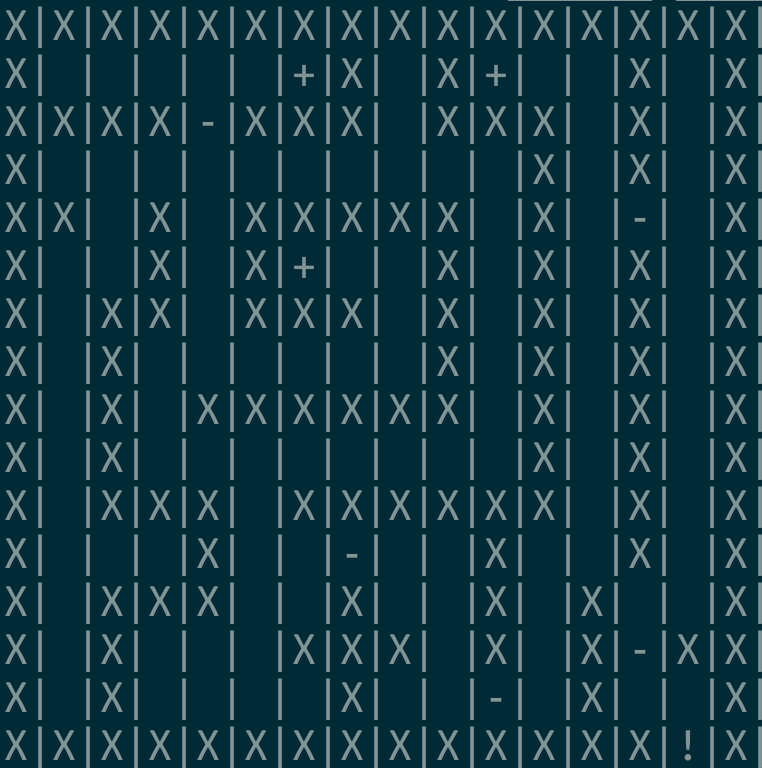
You start at the “1:1” location with 0 health (well, maybe it’s not health, but still) and your goal is to find a way out through the maze without dying. To move in any direction, you need to enter u, d, l or r for “up”, “down”, “left” and “right” respectively. If you step on a - cell, you will lose 1 health. If you step on a + cell, you will receive 1 health.
If you pay close attention, you’ll see that you won’t be able to pass the maze easily because you’ll die in the first trap. So, first of all, you need to gain health before going through it. To get the flag, you need to enter a sequence of directions as a long string, like “rrrrrldu” and so on, and your path needs to include enough + cells to not die.
That’s awesome, really 🙂